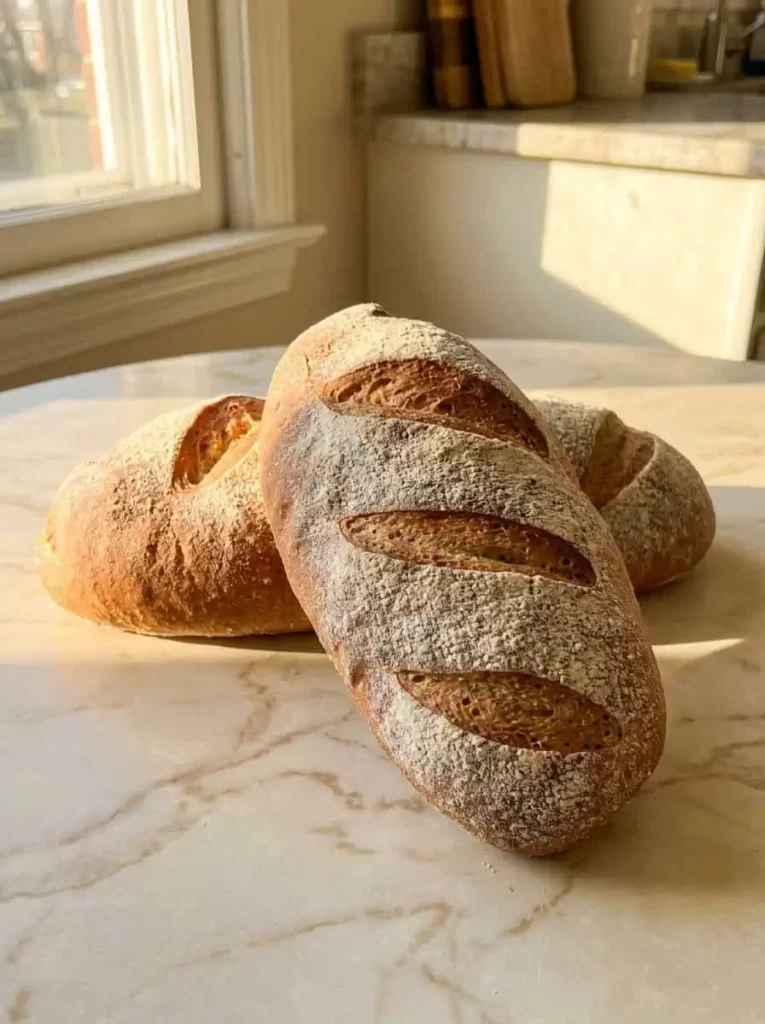
This is the bread I recommend to anyone who tells me they're afraid to bake yeast bread. Five ingredients, no preferment, no overnight rest, no special equipment beyond a bowl and a baking sheet. You mix, you knead, you let it rise twice, you bake. Two loaves in just over two hours, and the crust sounds hollow when you knock the bottom, which is one of the more satisfying sounds a kitchen produces.
The steam trick is what elevates it from a decent loaf to something that looks like it came from a bakery. A cast-iron pan on the bottom rack, a cup of boiling water poured in when the bread goes in, and the oven door shut fast. The steam keeps the crust supple long enough for the bread to rise to its full height before the crust sets. Once the steam dissipates, the crust crisps. That's the difference between a bread with a thick, crackly European crust and one that just bakes soft all the way through.
Five ingredients, and why each matters
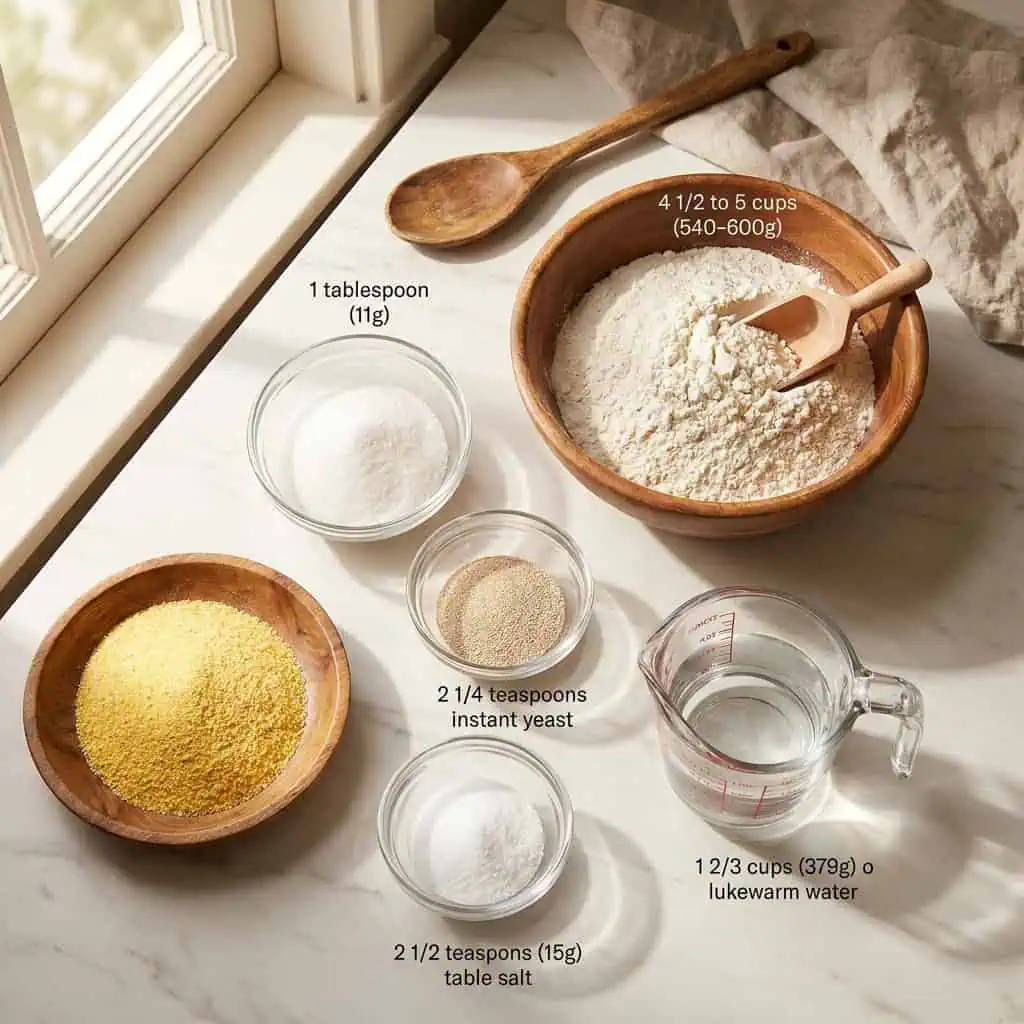
Bread flour, not all-purpose. Bread flour has more protein, typically 12 to 13 percent versus 10 to 11 for all-purpose, and that extra protein forms more gluten. More gluten means a stronger structure that holds gas from the yeast, which means a higher rise and a chewier crumb. All-purpose flour will work in a pinch but the loaves won't rise as high and the texture will be softer and less chewy. For this style of crusty European bread, bread flour is the right choice.
Weigh the flour. This is the single most important instruction in the whole recipe. A cup of flour scooped straight from the bag can weigh anywhere from 120 to 160 grams depending on how packed it is. The recipe calls for 540 to 600 grams. If you measure by volume and pack the cups, you can end up with 800 grams of flour in the bowl, which makes a stiff, dense dough that won't rise properly. A scale takes ten seconds and removes all of that uncertainty.
Instant yeast goes in dry with everything else. No proofing in warm water required. Table salt, sugar, and lukewarm water at 90 to 110 degrees. Cold water slows the yeast; water above 120 starts killing it. Lukewarm from the tap, or water brought to the right temperature and checked with a thermometer. The cornmeal is for the pan only, not the dough.
Kneading by hand and by machine
Six minutes by hand, seven by stand mixer on medium with the dough hook. By hand: fold the far edge of the dough toward you, press away with the heels of both hands, quarter turn, repeat. It's a rhythmic motion and after a minute or two it becomes automatic. The dough is done when it's smooth, springs back when you poke it, and stops sticking to the surface. If it's still sticking after five minutes, add flour a tablespoon at a time, not a handful.
In a stand mixer, the dough should clear the sides of the bowl and form a ball around the hook. If it's riding up the sides and not forming a ball, add the extra flour a spoonful at a time until it comes together. Overfloured dough in a stand mixer is harder to correct than underfloured, because the machine doesn't give you the tactile feedback your hands do.
The dough is right when it's bouncy and smooth and doesn't tear when you stretch a small piece thin. That's the windowpane test: gluten that's been developed properly will stretch translucent without breaking, like a pane of glass. If it tears immediately, knead two more minutes.
Two rises, one shaping
Cover the bowl and let the dough double at room temperature, one to two hours depending on how warm your kitchen is. A cold kitchen slows the yeast. The turned-off oven with the light on is a reliable 70 to 75 degree environment that speeds things up without being too hot.
Deflate gently, divide in half, and shape each piece into a log. The business-letter fold is the key: pat each piece into a rough oval, fold one short end to the center, the other short end over it, then press the seam closed with your palm and roll it into a log about ten inches long. The seam goes face-down on the baking sheet. That seam placement is what keeps the log from splitting along the side when it rises. Sprinkle the pan generously with cornmeal under each loaf.
Second rise: forty-five minutes under lightly greased plastic wrap. They should look noticeably puffier. The poke test tells you when they're ready: a gentle finger poke into the side that leaves an indentation that slowly springs back means the dough is properly proofed. An indentation that springs back immediately means it needs more time. One that doesn't spring back at all means it may be slightly overproofed, in which case bake immediately.
Steam, scoring, and the bake
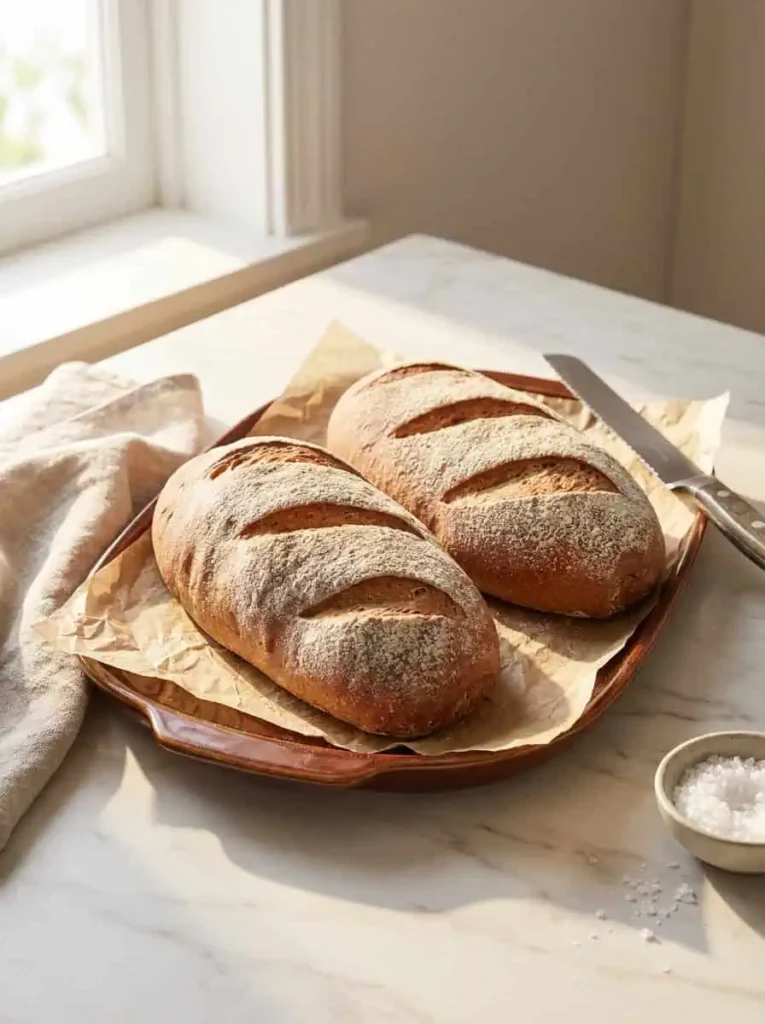
Oven at 450 with the empty cast-iron pan on the lowest rack while the bread does its second rise. Dust the loaves with flour through a sieve for the bakery look, then score with three or four diagonal slashes half an inch deep. The scoring is functional, not just decorative: it gives the bread a controlled place to expand as it bakes. Without it, the loaf finds its own weak point and splits unpredictably.
Bread in the oven, boiling water immediately into the cast-iron pan, door shut fast. Oven mitts on for this; the steam is instant and intense. Bake twenty to twenty-five minutes until the crust is golden and the loaves sound hollow when tapped on the bottom. Internal temperature at least 190 degrees. Turn the oven off, crack the door, and leave them inside for five more minutes. That gradual cool-down keeps the crust from going soft.
Why bread baking is worth learning
I grew up around bread, but not this kind. The bread I knew was flatbread, yeasted or not, cooked on a griddle or in a clay oven, made by hand in a way that had more to do with feel than with measurements. Learning to bake a European-style loaf in a Western oven was a different education. The variables are different, the tools are different, and the timing is more precise. But the satisfaction of pulling a hollow-sounding loaf off the rack is the same across both traditions. You made bread. That still matters.
Cool before cutting. This is the instruction most people ignore and most regret ignoring. Hot bread continues to cook from residual heat as it cools, and the crumb sets during that time. A loaf cut hot is gummy and compresses under the knife. Ten to fifteen minutes of patience gives you a clean slice and the texture the recipe promised. Makes two loaves. Store well-wrapped at room temperature for two days, or freeze for longer.
When you're ready for the next step
This recipe is the foundation. Once you've made it two or three times and it feels comfortable, you can start varying it: add a tablespoon of olive oil for a slightly softer crumb, swap a quarter of the flour for whole wheat for more flavor and density, or use a portion of the water as milk for a richer loaf. The method stays exactly the same. Every adjustment teaches you something about how dough behaves, and that knowledge transfers to every bread you bake after this one.
A beginner-friendly European crusty bread made with bread flour, instant yeast, and a steam method for the perfect crust. Two loaves in just over two hours.
Ingredients
4 1/2 to 5cups bread flour 540g to 600g (plus extra for kneading)
1tablespoon granulated sugar (11g)
2 1/4teaspoons instant yeast
2 1/2teaspoons table salt (15g)
1 2/3cups lukewarm water (379g)
Yellow cornmeal (for the pan)
Instructions
1
Weigh the flour or measure by spooning into cups and leveling off. Stir all ingredients (except cornmeal) together in a large bowl until a rough, shaggy dough forms.
2
By hand: turn onto a lightly floured surface and knead for 6 minutes until smooth and bouncy, adding extra flour as needed. By stand mixer: knead with the dough hook on medium for 7 minutes until smooth and elastic and the dough clears the sides of the bowl.
3
Place the dough in a lightly oiled bowl, cover, and let rise at room temperature until doubled, 1 to 2 hours.
4
Gently deflate the dough and divide in half. Pat each piece into a rough oval, fold the short ends in like a letter, press the seam closed, and roll into a 10-inch log.
5
Place loaves seam-side down on a cornmeal-dusted baking sheet. Cover loosely with greased plastic wrap and let rise for 45 minutes until noticeably puffy. The loaves are ready when a gentle finger poke leaves an indentation that slowly fills back in.
6
Place an empty cast-iron pan on the lowest oven rack and preheat to 450 degrees Fahrenheit. Bring 1 cup of water to a boil.
7
Dust the loaves with flour through a sieve and slash the tops with 3 to 4 diagonal cuts, about 1/2 inch deep.
8
Place the bread in the oven, pour the boiling water into the cast-iron pan, and immediately close the oven door. Use oven mitts. Bake for 20 to 25 minutes until deeply golden and hollow-sounding when tapped on the bottom. Internal temperature should reach at least 190 degrees Fahrenheit.
9
Turn the oven off, crack the door, and leave the bread inside for 5 minutes. Transfer to a rack and cool for at least 10 to 15 minutes before slicing..
Nutrition Facts
Servings 2
Amount Per Serving
Calories70kcal
% Daily Value *
Sodium180mg8%
Total Carbohydrate15g5%
Dietary Fiber1g4%
Protein3g6%
* Percent Daily Values are based on a 2,000 calorie diet. Your daily value may be higher or lower depending on your calorie needs.
Note
Weigh the flour rather than measuring by volume for consistent results. Rest Time is approximately 1 to 2 hours first rise plus 45 minutes second rise (105 minutes midpoint estimate). Use oven mitts when adding boiling water to the hot pan; the steam is instant. Cool at least 10 to 15 minutes before cutting. No nutrition data was provided for this recipe.